'PGE' Search Results
Success! These links should assist your search.
The following pages were targeted against the tag: PGE. Click on the thumbnail or title to learn more.
Page Generator Editor - Main Page
- Working Set: Allows you to display a page and all its sub-pages in either of the columns below. All pages that have sub-pages are listed in this drop-down box. Selecting a page will automatically update the pages listed in the column in which it is listed. To go back to seeing all pages select 'All Records' in the drop-down box.
- Filter Records By Title: To filter pages in the columns you can type in the name of the page. The page will show in the columns below. The title is the 'Name of the Page' field in the General Tab of the page editor.
- Edit by page ID: Next to the page name in the columns is the ID number. To search by ID number enter that number and click 'Edit'. You will be taken to the general tab for that page editor. Note: You can easily find the id number of a page in your site by looking in the address bar with the site open, it will be displayed as 'pageID/id#'.
- Modified: To search by when a page was modified select an option from the drop-down box, then enter the date. Or select the calendar icon and select the date that way.
- Inactive Pages (No. of Pages): These are pages that you are currently working on and have not yet published.
- Published Pages (No. of Pages): These are the pages that are active on your site.
- Add New: Click here to add a new page.
- Edit: Highlight the page you want to edit, the page can be in either the Inactive or Published columns then click 'Edit'.
- Delete: Highlight the page you want to delete from either the Inactive or Published columns then click 'Delete'. Note: DO NOT DELETE PAGES WITH REDIRECTS (text after the ID number) these pages contain your purchased tools. It is a good idea to never delete pages. Simply deactivate them - unless you know for sure that they are no longer needed. Restoring deleted pages (if possible) is time-consuming and will be a billable task.
- Publish: To make an Inactive page active on your site, highlight the page in the Inactive column and click 'Publish'. You will see the page move over to the Published Pages column.
- Deactivate: To make a page inactive highlight the page in the Published Pages column and click 'Deactivate'. You will see the page move over to the Inactive Pages column.
- Add New Section: (Clarity Admin Only)
- This feature (if visible) is for Clarity Connect Administrators only.
- Glossary of Fields: Shows you the many levels of subpages your site can have. It is for reference only.
Page Generator Editor - Content Tab
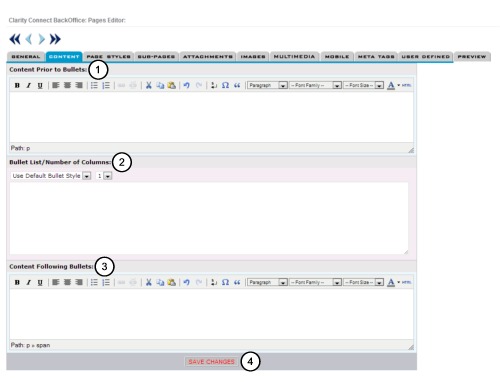
1) Content Prior to Bullets:
The text entered here will appear below the text you entered in the 'Summary' field of the General Tab when you created the page. This text will show above bulleted content which you will enter next.
2) Bullet List / Number of Columns:
From the first drop down list select your bullet style.
From the second drop down list select the number of columns you would like to have.
Note: If you select 3 columns then there must be at least 3 items entered for all the columns to be visible.
3) Content Following Bullets:
Enter text here that will appear after the bulleted listing.