User Manual » Page Generator Editor »
Page Generator Editor - General Tab
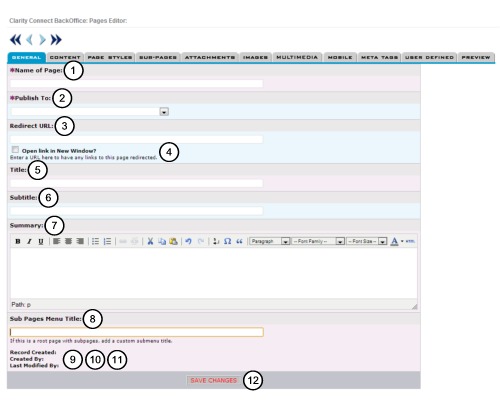
1) Name of Page: (Required)
Name your page based on its contents.
ex. About Us - lets the user now that this page is about your company.
2) Publish To: (Required)
In the drop down box select a page to have a link to this page created.
Note: If you want this to be a main navigational item publish it to the home page.
Note: To create a subpage select the page you want this page linked to. This page will then show up in that pages 'Sub Pages Menu' which you can label in the 'Sub Pages Menu Title:' field below.
3) Redirect URL:
This will be a link to another page on the web. Make sure to include http://www. and the site name.
Note: By putting in a link this will disable the editing features for the page because this feature turns the page into a link to another site.
4) 'Open link in New Window':
Selecting this will open a new window when the user clicks on the link.
5) Title:
Enter a title here that will show up at the top of the page.
ex. "Perennials"
6) Subtitle:
Enter a subtitle that will appear below your title.
ex. "A wide variety to suite every whim!"
7) Summary:
The text entered here will be the first text presented at the top of the page.
Use the editing tools to add text effects, alignment, bullets, etc.
The 'Path: p' at the bottom of the input box is for Clarity Connect internal use and will not affect your site.
8) Sub Pages Menu Title:
Sub pages will be displayed in a box on the page in a bullet layout. This menu title briefly describes the links.
ex. You have several projects that you have made pages for, your title could be "Additional Projects".
Note: Long menu titles will throw off formatting and look unprofessional, its best to keep them short.
9) Record Created:
This is the date the page was created. It is automatically generated for you.
10) Created By:
This shows who created the page. This is generated by the person who logged into the console.
11) Last Modified By:
This shows the name of the person and the date and time the page was last modified.
12) Click 'Create This Record'
Click to save the page to the Inactive column in the Page Generator Main Page.
Click on 'Pages Editor' in the breadcrumb list at the top of the page to return to the Page Generator Main Page.
Here you will see the page you just created in the Inactive Pages column.