User Manual » Random Image Editor »
Random Image Editor - General Tab
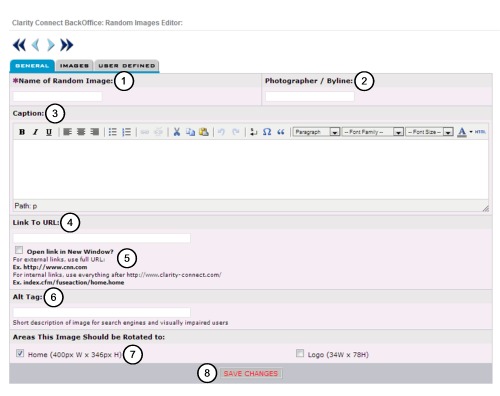
1) Name of Random Image: (Required)
Enter a name for the image.
2) Photographer / Byline:
Enter the name of the photographer or enter a byline.
3) Caption:
Enter a caption for the image.
4) Link To URL:
Insert an optional URL (web address) here to have the picture a hyperlink. When the user clicks on the image it will take them to the link you enter. If you want to link the image to a page on your website, use the 'relative URL' which is everything AFTER the end of your 'base' URL. Learn more from the video at the bottom of the page.
5) 'Open link in New Window'
Click this checkbox if you would like your visitor to stay on your page while they visit the new website in a new window.
ex. If you are promoting a trade show that you are involved in, you can make this image an advertisement for that show and allow visitors to go and visit their website while still having your site open for them to return to.
6) Alt Tag:
Short description of image for search engines and visually impaired users.
7) Areas This Image Should be Rotated to:
This will display preset areas that were set up for you when your site was built. Clicking the checkbox next to the location will make the image display there.
8) Click 'Create This Record' / 'Save Changes'